
Key takeaways
- Shells like Proxima and Tiel function as your primary classes and should be equipped immediately upon reaching the open world for significant attack and defense bonuses.
- Glimpses are strictly limited and should be invested primarily in developing two shells you intend to main, not wasted on secondary functions like summoning NPCs.
- The Slayer Seal provides crucial combat assistance while Night Mode offers increased difficulty with exclusive vendor access and higher experience rewards.
- Mushroom Village Gate offers an optimal early grinding location where a tall bipedal creature drops over 2000 gloom per kill with quick beacon respawn access.
Starting Mortal Shell II presents a daunting prospect for players unfamiliar with its mechanics. The game demands careful planning and strategic decision-making from your earliest moments. These essential tips will accelerate your progression and prevent common early-game mistakes.
Shells: Choosing Your Primary Class
Upon your first conversation with NPCs at Marrow Keep, your map will reveal the locations of two shells: Tiel and Proxima. These shells function as your game’s primary classes and merit immediate attention once you reach the open world. While the Harbinger main character frame performs adequately, equipping a shell delivers crucial attack and defense bonuses that prove indispensable for survival.
Proxima offers particular advantages for exploration throughout the open field. Its special ability forces defeated enemies to drop valuable sellable items—a tier 3 unlock that demands significant investment but pays substantial dividends. Late-game currency can grow scarce even with Tarstones that boost money drops, making this ability invaluable for farming resources efficiently. Both Tiel and Proxima serve as solid all-around choices for the majority of your playthrough, though Proxima’s loot generation separates it as a farmer’s preferred option.
Essential Settings and Initial Pickup Strategy
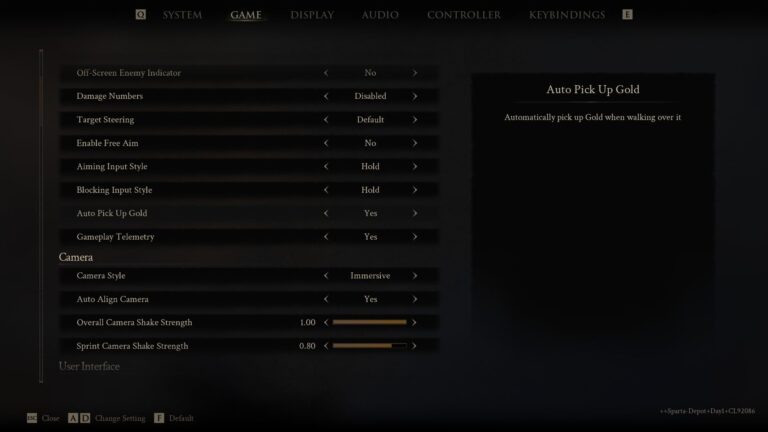
Immediately enter your settings menu and enable auto pick up gold. This simple toggle automatically collects coins you walk over, adding them directly to your wallet. In locations like swamps where ground loot becomes visually obscured, this feature prevents frustrating missed currency opportunities and streamlines your resource gathering fundamentally.

Managing Your Finite Progression Resources
Glimpses and Ability Tree Development
Glimpses function as your primary tool for strengthening shells and unlocking their skill trees, but they exist in strictly limited quantities throughout any given playthrough. Pre-release testing indicated that available Glimpses allow complete development of roughly two shells with a handful remaining for minor supplementary investments. The developers may adjust these drop rates in future patches, but currently you must spend these resources deliberately.
Avoid the temptation to burn Glimpses on secondary applications. While you can use them to locate additional shells or summon NPCs for major boss encounters, these applications yield minimal benefit compared to expanding your core shell abilities. Channel your Glimpse spending toward the two shells you intend to main throughout your journey.
Tarstones and Weapon Augmentation
The game distributes just over 70 Tarstones across its world—items that enhance your weapons, passive effects, and special attacks. Their progression system encourages regular switching as they accumulate experience. Don’t hesitate to swap in different Tarstones once they hit their experience thresholds; keeping them in rotation ensures continuous growth across your arsenal diversity.
Specific Tarstones correspond with weapons dropped by major bosses, serving as navigational hints toward their locations. If you struggle to locate a particular weapon, Merrick the vendor inside Marrow Keep sells maps revealing their general regions. This merchant becomes an essential hub for your resource acquisition and equipment planning.
Exploration and Hidden Discoveries
Identifying False Walls Through Symbol Markers
Mortal Shell II follows Soulslike conventions by concealing passages behind false walls. Most display a distinctive glyph painted directly on their surface. Whenever you encounter this symbol on walls, tombstones, or other surfaces, strike it to reveal hidden areas. This consistent marker system removes exploration guesswork and rewards careful observation.
Consumable Items and Dual-Purpose Equipment
Items in your inventory serve functions beyond immediate healing or status effects. You can use them directly during exploration for instant benefits like health restoration and status mitigation. Simultaneously, equip them in passive slots for continuous effects such as steady health regeneration or flat damage reduction. These passive bonuses scale in strength based on how many consumables you’ve discovered—the game rewards thoroughness in collection rather than current reserves.
The Sheephead Totem perfectly demonstrates this mechanic. Early in your playthrough, you’ll encounter a minor boss that commands a small flock of sheep while attempting to convert you into one. Defeating this boss grants the Sheephead Totem, which transforms you into a defenseless sheep when consumed. More importantly, its passive effect directly reduces all enemy HP. Additional sheep scattered throughout the game—some extremely well-hidden—further amplify this passive bonus each time you collect one.
Beacon Cleansing and Mini-Dungeons
Nearly every beacon checkpoint doubles as a mini-dungeon requiring cleansing. You should complete this task at every beacon you discover. Some contain substantial rewards like weapons or Tarstones that meaningfully upgrade your arsenal. Others yield Ova that unlock endgame content earlier. Regardless of immediate rewards, beacon cleansing consistently justifies the effort required.
Combat Assistance and Difficulty Scaling
If you find combat genuinely overwhelming, locate the Slayer Seal positioned just past Merrick inside Marrow Keep. Equipping it disables trophies and achievements—a significant trade-off that unlocks powerful combat enhancements. The seal substantially amplifies your sidearm’s effectiveness while healing you with each riposte attack. Certain shells feature special abilities generating abundant riposte opportunities, creating a healing loop that sustains you without consuming consumable reserves.
Once you’ve developed combat confidence, Night Mode offers a substantially harder challenge with exclusive benefits. To unlock it, warp to Widow’s Overlook beacon, turn toward the sandy graveyard behind you, and claim the Gloombound Flame from one of the headstones. Bring this flame to the top of Marrow Keep to activate Night Mode. This difficulty modifier increases enemy HP dramatically while amplifying their damage output, essentially functioning as Hard Mode. The payoff arrives through increased gloom experience rewards and access to exclusive vendors and events unavailable in standard difficulty. This option becomes accessible immediately after reaching Marrow Keep, allowing ambitious players to pursue the enhanced challenge from relatively early in their playthrough.
Efficient Leveling and Experience Grinding
An excellent early grinding location exists directly in front of Mushroom Village Gate. From that beacon—cleanse it first—head up the bridge away from the gate itself. You’ll find a tall, bipedal creature with large mandibles. This monster stunlocks easily and drops over 2000 gloom per kill while remaining close enough to the beacon for quick returns between respawns. When you’re chasing specific experience thresholds—particularly when approaching base attack increases or shell point acquisitions—this location accelerates your growth considerably. Since Mortal Shell II’s experience system progresses linearly with some thresholds offering better stat gains than others, strategic grinding here optimizes your character development during crucial progression windows.
Frequently Asked Questions
What shells should I prioritize first in Mortal Shell II?
Head directly for Tiel or Proxima upon reaching the open field, as both serve as excellent all-around choices. Proxima excels for farming thanks to its tier 3 ability that makes enemies drop valuable sellable items.
How should I manage my limited Glimpses?
Invest Glimpses primarily in developing two shells you plan to use throughout the game. Avoid using them to locate additional shells or summon NPCs for boss fights, as these provide minimal benefit compared to expanding your core shell abilities.
Where can I efficiently grind experience early in the game?
The optimal location is directly in front of Mushroom Village Gate. A tall, bipedal creature with large mandibles there stunlocks easily and drops over 2000 gloom per kill while staying close to the beacon for quick respawns.
